
A thoughtful deck step lighting installation makes outdoor stairs easier to see after dark, defines each tread and gives a deck a finished appearance. The goal is not maximum brightness. Aim for consistent, low-glare light that reveals every step, avoids dark gaps and stands up to outdoor weather.
What is deck step lighting?
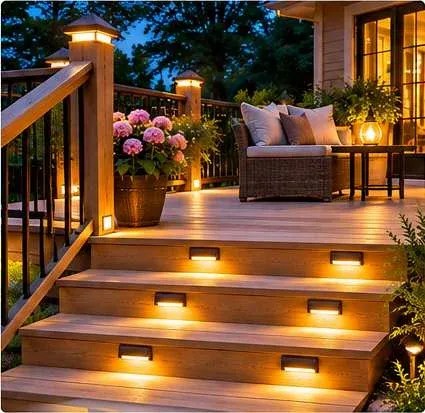
Deck step lights are compact fixtures that illuminate stair treads, risers or nearby stringers. Some are recessed into the riser, others mount on the surface, posts or railings. Their purpose is to make changes in level visible without shining directly into people’s eyes. A good layout creates a clear visual rhythm from the landing to the bottom step.
Choose the right fixture type
Recessed riser lights
Recessed fixtures sit in the vertical face of a riser and direct light down onto the tread. They create an integrated look and protect much of the fixture body from knocks. Check cutout depth, housing size and future service access before choosing one.
Surface-mounted step lights
Surface-mounted models can be easier to retrofit because they need no large recessed opening. Check their projection so they do not catch shoes or equipment.
Low-voltage LED lights
Low-voltage systems use a transformer and compatible fixtures. Correct cable sizing, connections, transformer capacity and outdoor-rated components still matter. Follow the system wiring diagram and avoid mixing incompatible parts.
Solar step lights
Solar fixtures can simplify retrofits where routing power is difficult. Performance depends on sunlight, panel orientation, battery condition, weather and seasonal daylight. Put the panel where it receives useful direct sun. If the stair face is shaded, consider a model with a separate panel.
Railing and post lights
Post or railing lights can supplement step fixtures, especially on wide stairs and landings. Do not rely on distant lights alone if individual tread edges remain in shadow.
Where should deck step lights go?
For many staircases, mount each fixture on the vertical riser or adjacent stringer so it illuminates the tread below. Keep it far enough from the tread edge to reduce glare and protect it from foot traffic. Aim the beam across the walking surface, not toward someone approaching the stairs.
Do you need a light on every step?
Not always. The number depends on beam spread, stair width, fixture output, ambient light and obstructions. Lighting every riser can create a continuous pattern, but a different arrangement may work if it still makes every tread easy to distinguish. Test the stairs at night and check for dark gaps.
How far apart should fixtures be?
Use the fixture’s beam angle and stair width to plan spacing. Narrow beams may require more fixtures than broad, diffused beams. Walls, railings, plants and dark finishes affect the result. Mock up the layout before cutting openings or routing cable.

Brightness, beam direction and color
Choose modest output with a shielded or downward-directed beam. Excessive brightness can cause glare and make nearby dark areas harder to see. Compare lumens, beam angle and color temperature rather than choosing by wattage alone. Warm white around 2700K–3000K often blends naturally with wood decking and outdoor entertaining spaces. Frosted lenses soften the beam; shields help keep light out of users’ eyes.
Outdoor ratings and materials
Deck fixtures face rain, humidity, temperature changes, dust and sometimes irrigation spray. Check the product’s IP rating and the manufacturer’s outdoor-use conditions. An IP rating describes resistance under defined tests; it does not automatically mean a fixture can be submerged or exposed to every condition.
- Choose fixtures specifically approved for outdoor use.
- Check the IP rating and limits on direct water exposure.
- Use corrosion-resistant materials and suitable fasteners.
- Use outdoor-rated cable, connectors, boxes and transformers where required.
- Confirm compatibility with the deck material and installation depth.
- Follow instructions for drainage, sealing and maintenance access.

Wiring options for new and existing decks
Plan before construction
If the deck is still being designed, decide fixture positions and cable routes before closing the risers. This makes it easier to hide cables, protect connections and retain service access. Record cable and junction locations for future repairs.
Retrofit an existing deck
Inspect the underside and sides of the stairs before selecting fixtures. Confirm there is room for the housing, wiring and access. Avoid drilling where you may hit structural supports, hidden fasteners or existing cables. Inspect the space behind a proposed cutout rather than guessing.
Solar installation
Check whether the panel is integrated or remote. An integrated panel may be shaded on the riser even when that position is ideal for the light. A separate panel can be placed in a sunnier location if the cable route and product design allow it.
Low-voltage installation
Calculate total load and check transformer capacity, cable length and maximum run. Voltage drop can make distant fixtures dimmer. Use compatible connectors and protect connections from moisture as specified.
Step-by-step installation plan
- Measure the stairs. Record step count, width, depth, rise, landings and railing positions.
- Select fixtures. Compare recessed, surface-mounted, low-voltage and solar options against the deck construction and power available.
- Map the beam pattern. Mark each location and consider stair width, shadows and glare.
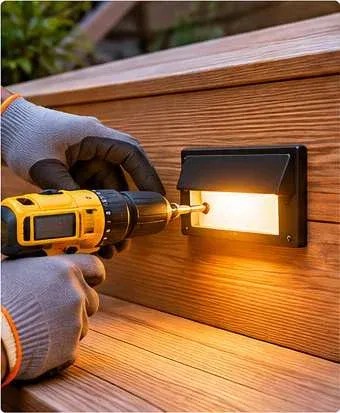
- Check the structure. Locate stringers, framing, fasteners and hidden services before drilling.
- Plan power and access. Confirm cable routes, transformer or panel position and future access to connections.
- Test the layout. Temporarily position lights and inspect the pattern after dark where practical.
- Install to instructions. Use the specified cutout, hardware, seals and wiring method.
- Test every tread. Confirm consistent visibility, comfortable brightness and reliable operation.
- Document the work. Keep the wiring diagram, product details and cable route notes.
Common mistakes to avoid
- Using excessive brightness that creates glare.
- Aiming the beam toward approaching users.
- Skipping a night test and discovering dark gaps later.
- Using indoor fixtures in an exposed outdoor location.
- Placing solar panels in shade from railings, plants or the house.
- Sealing fixtures or connections where they cannot be serviced.
- Drilling without checking for framing or hidden services.
Maintenance
Inspect fixtures after severe weather and periodically during the year. Clean lenses and solar panels using manufacturer-approved methods. Look for loose fasteners, cracked housings, damaged cable jackets, corrosion or moisture inside a fixture. Replace rechargeable batteries only with the specified type. If a low-voltage system becomes uneven, check transformer load, connections and voltage drop before installing brighter lamps.
More outdoor lighting ideas
Plan a broader scheme with our outdoor lighting ideas guide. For locations without an outlet, read solar lights for a pergola without an outlet and outdoor solar fairy lights.


Frequently asked questions
Are solar lights bright enough for deck steps?
They can work when designed for step lighting and charged by adequate sunlight. Check runtime and test through several evenings, including after cloudy weather. Decorative solar lights are not automatically suitable for stair visibility.
Do lights need to be installed on every step?
Not necessarily. The arrangement depends on beam spread, width and ambient light. The finished staircase must have consistent visibility without dark gaps.
What color is best?
Warm white around 2700K–3000K is popular outdoors. Controlled beam direction and even coverage matter more than color alone.
Can I install deck step lights myself?
Some solar or battery-powered products are designed for simple mounting. Electrical and low-voltage work must follow the product instructions and local rules. Use a qualified electrician for line-voltage work or whenever uncertain.
What IP rating should I choose?
Choose a product whose manufacturer approves it for the exposure at the installation location. Sheltered decks, exposed stairs and areas near irrigation can have different requirements. Check the rating and limitations rather than relying on the word “waterproof.”
Final recommendation
Plan around visibility, even coverage and low glare. Choose outdoor-rated fixtures, position them to illuminate each tread, test the layout after dark and protect wiring and connections as specified. A consistent, modest light pattern is usually more useful than a few very bright fixtures.


